Copper Bathtub Installation
Step-by-step installation guides for your new freestanding bathtub.
Sinkology can be defined as the study of sinks: we are here to educate and support you—and that extends well beyond the day you make your purchase. We’ve created step-by-step installation guides to give you the information and details you need to complete your at-home installation.
When you choose one of our products, we will be with you every step of the way. In everything we do, we prioritize your satisfaction, which means we believe in offering great customer service to every customer, every day. Your experience with us defines our business. If you need assistance with your installation or have questions about your product, contact our team of Sinkologists.
Step-by-Step Installation Guides for Sinkology Copper Sinks
The following instructional guide covers installation steps and requirements for Sinkology bathtubs and drains.
Download our full installation guide (PDF).
Bathtubs: Freestanding
Professional Installation Recommended
Every Sinkology copper bathtub is skillfully hand-hammered and carefully finished by our team of coppersmiths. Each bathtub is hand-tested multiple times to ensure no leaks and perfect performance.
Sinkology copper bathtubs are handmade so variations in dimensions can occur. We recommend performing rough-in procedures with the bathtub on site to ensure the correct installation.
1. Gather the products being installed and the tools you will need. It’s easier to install your drain and faucet before placing the tub.
2. Install the drain and overflow drains onto the bathtub per the drain and overflow kit instructions.
3. Install the faucet per the manufacturer’s instructions.
4. Place bathtub in desired location and mark exact location on the floor.
5. Run the drain pipes through the floor and attach to the plumbing. This step is best handled by a professional.
6. Once placement is final, apply Sinkology antique brown or clear neutral cure 100% silicone (#SINSTALL-101) caulk around the tub. Allow the caulk to set for 24-hours (or timing per the manufacturer’s instructions) before using your copper tub.
Bathtubs: Drain + Overflow Kit
Professional Installation Recommended
Bathtub drain and overflow kits feature a durable and beautiful custom bronze finish designed to look and work beautifully with Sinkology freestanding copper bathtubs.
Sinkology copper bathtubs are handmade so variations in dimensions can occur. We recommend performing rough-in procedures with the bathtub on site to ensure the correct installation.
1. Loosely assemble selected freestanding bathtub waste drain or overflow kit onto bathtub (leaving off the tailpipes at this time).
2. Determine water line locations for selected bathtub filler. Tub faucet may need to be assembled prior to tub installation.
3. Place bathtub in final location and mark exact location on the floor.
4. Rough-In final plumbing waste drain and water lines into proper locations. We recommend using OS&B (#ITD35) rough-in kit. This kit is designed to work with most freestanding bathtubs and makes plumbing rough-in fast and easy, and ensures a watertight connection. See diagram 1.
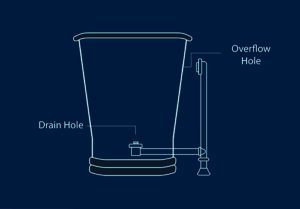
Diagram 1
Bathtubs: Rough-In Waste Drain
Professional Installation Recommended
The copper bathtub rough-in kit not only makes installation easier, but it saves time and money. Designed to work specifically with Sinkology copper bathtubs, and is protected by a Lifetime Warranty.
Sinkology copper bathtubs are handmade so variations in dimensions can occur. We recommend performing rough-in procedures with the bathtub on site to ensure the correct installation.
1. Final waste drain and waterline rough-in’s should be completed and flooring should be finished. Ensure bathtub is properly supported and level.
2. Double check bathtub faucet installation requirements before final bathtub installation.
3. Apply thread sealant or plumbers tape to any threaded connections that do not have rubber gaskets.
4. Apply plumbers putty to underside of drain flange and thread through the bathtub and into drain pipe.
5. Ensure waste drain and overflow is securely connected to bathtub.
6. Place tub back into desired location and verify that bathtub is level. If using recommended rough-in kit (#ITD35), the tub will need to be lifted approximately 8” before lowering into final position.
7. Finish installation by running a bead of silicone adhesive around the base of copper freestanding bathtub where applicable to create a watertight seal.
8. Allow sealants and adhesive to thoroughly dry before filling bathtub with water. Consult sealant and adhesive manufacturers for dry times, as they may vary.