Bath Sink Installation
Step-by-step installation guides for your new bath sink.
Sinkology can be defined as the study of sinks: we are here to educate and support you—and that extends well beyond the day you make your purchase. We’ve created step-by-step installation guides to give you the information and details you need to complete your at-home installation.
When you choose one of our products, we will be with you every step of the way. In everything we do, we prioritize your satisfaction, which means we believe in offering great customer service to every customer, every day. Your experience with us defines our business. If you need assistance with your installation or have questions about your product, contact our team of Sinkologists.
Important Note about Installation Styles
Sinkology copper sinks can be installed in a variety of ways, and each way varies based on the type of sink you purchased and your personal preference. It is important to know which type of installation style you prefer and pick your new Sinkology sink to match. Our Sinkology Installation Guides cover the following styles of bath sink installation:
- Drop-In: Drop-In sinks are designed to be easy to install in a wide range of countertop materials. Sinkology copper sinks make updating your design effortless.
- Undermount: Undermount sinks are the ideal choice for a clean high-end look with granite or solid surface countertops. This installation maximizes countertop space and highlights the elegance of your countertop.
- Vessel: Vessel sinks are an easy way to add character and style to any bathroom. Vessel sinks install directly on top of your countertop and are reminiscent of old wash basins. This unique and luxurious sink style is easy to install and are available in a wide variety of styles and finishes.
Step-by-Step Installation Guides for Sinkology Copper Sinks
The following instructional guide covers installation steps and requirements for Sinkology bath sinks and drains.
Download our full installation guide (PDF).
Bath Sinks: Drop-In
Drop-In sinks are designed to be easy to install in a wide range of countertop materials. Sinkology copper sinks make updating your bathroom design effortless.
Sinkology bathroom drop-in sinks do not use mounting hardware. Our preferred mounting method requires expanding foam and 100% silicone to secure your copper sink into place.
1. Flip sink upside down and trace outside edge onto craft paper or cardboard. Add a second line 1/2” inch inside the first line. Cut out the center of the template using the second line.
2. Place the template on the countertop and trace the template. Cut the installation hole in the countertop.
3. Position the sink in the hole and check for gaps around the rim. Eliminate gaps by gently tapping the rim with a rubber mallet.
4. Weigh the sink down and apply polyurethane expanding foam underneath the sink to seal the gap between the sink and the countertop to secure the sink in place.
5. Use plumbers putty on the underside of the drain lip to seal the drain to the sink. See diagram 1.
6. Apply Sinkology antique brown or clear neutral cure 100% silicone around the rim of the sink to form a water tight seal. See our Complete Silicone Installation Kit (#SINSTALL-101) for Copper Sinks.
7. For regular maintenance simply wash with gentle soap and water. For extra protection against water spotting, use Sinkology Copper Armor care kit (#SARMOR-101) or high quality carnauba wax.
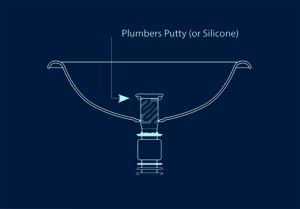
Diagram 1
Bath Sinks: Undermount
Professional Installation Recommended
Undermount sinks are the ideal choice for a clean high-end look with granite or solid surface countertops. This installation maximizes countertop space and highlights the elegance of your countertop.
Sinkology undermount sinks do not include mounting hardware. We recommend providing your sink details to your countertop manufacturer for approved mounting hardware and method.
1. Flip sink upside down on a sheet of craft paper or cardboard and trace the outside rim of the sink. Select preferred countertop offset. See diagram 1. Measure the distance between the edge of the basin and the inside edge of the lip. Add a second line inside the first according to this measurement. Cut out the template along the second line.
2. Place the template onto the countertop and cut the hole into the countertop.
3. Use clear or Sinkology antique brown neutral cure 100% silicone (#SINSTALL-101) on the rim of the sink. Mount sink under the countertop using approved countertop mounting hardware. See diagram 2. Sinkology does not provide under mounting hardware due to the wide variety of mounting surfaces which require specific hardware. Contact your countertop manufacturer for specific mounting hardware.
4. Slide the drain through the drain hole in the basin. Use plumbers putty on the underside of the drain lip to seal the drain assembly to the sink and clean off any excess See diagram 3.
5. To complete your install we recommend applying a thin bead of Sinkology antique brown or clear neutral cure 100% silicone to any gaps between sink and countertop.
6. For regular maintenance simply wash with gentle soap and water. For extra protection against water spotting, use Sinkology Copper Armor care kit (#SARMOR-101) or high quality carnauba wax.
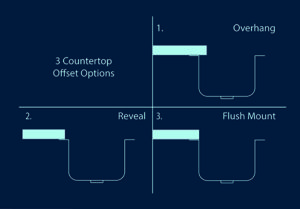
Diagram 1
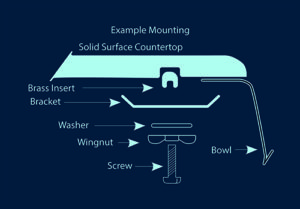
Diagram 2
Diagram 3
Bath Sinks: Dual Flex
Copper sinks featuring our exclusive Dual Flex rim are approved for undermount or drop-in applications. The Dual Flex rim features a flat undermount rim with slight bend allowing for functional and beautiful drop-in or undermount installation.
Dual Flex copper sinks can be identified by their unique rim design. A Dual Flex rim will have a flat under mounting surface and a decorative curved edge.
Please reference your preferred installation methods instructions for Drop-In or Undermount.
Bath Sinks: Vessel
Vessel sinks are an easy way to add character and style to any bathroom. Vessel sinks install directly on top of your countertop and are reminiscent of old wash basins. This unique and luxurious sink style is easy to install and are available in a wide variety of styles and finishes.
Sinkology copper vessel sinks are designed to be installed securely in a 2-3/4” inch hole in the countertop. Sinkology does NOT recommend vessel mounting rings.
1. Flip sink upside down and trace outside edge onto craft paper or cardboard. Mock up any plumbing connections and faucet placement to ensure necessary clearances. Cut out template and place on the countertop. Mark the center location of the sink on the countertop.
2. Drill a 2 ¾” inch diameter hole in your countertop at the center mark. A 1/8th inch beveled edge is recommended, but not necessary. See diagram 1.
3. Apply Sinkology antique brown or clear neutral cure 100% silicone (#SINSTALL-101) to the edge of the hole and mount sink into place. Apply plumbers putty on the underside of the drain lip and assemble the drain.
4. Place the large steel mounting washer over the drain pipe and tighten the brass locknut until the steel washer is firmly attached to the underside of the countertop, holding the entire sink in place. See diagram 2.
5. For a professional look add a bead of Sinkology antique brown or clear neutral cure 100% silicone around the base of the sink.
6. For regular maintenance simply wash with gentle soap and water. For extra protection against water spotting, use Sinkology Copper Armor care kit (#SARMOR-101) or high quality carnauba wax.
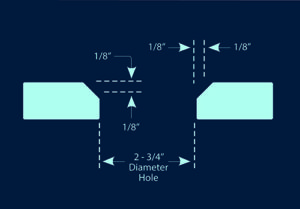
Diagram 1
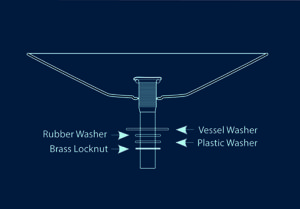
Diagram 2
Bath Sink: Drains
Sinkology bathroom sink drains are constructed of solid bass and hand finished to complement Sinkology bathroom sinks. Sinkology grid and pop-up bath sink drains work with most standard No-Overflow sinks and are protected by a Lifetime Warranty.
Sinkology bath drains feature a no-overflow design and should only be installed into bathroom sinks without overflow holes. If your sink has an overflow, you will need to purchase an overflow sink drain, available at most retailers. See diagram 1.
1. Wash and dry the sink and the drain.
2. Remove lock nut, rubber washer and white plastic washer from drain stem.
3. Apply plumbers putty on the underside of the drain lip and slide the drain into sink drain hole. The drain and the metal of the sink will be touching with a thin layer of plumbers putty creating a water tight seal around the drain. Wipe off excess plumbers putty, it could stain your copper sink.
4. If you do not have a vessel sink, skip to Step 5. If you have a Sinkology copper vessel sink you should have received a large steel washer with your sink. This washer slides up the drain pipe first.
5. Slide the rubber washer onto the drain stem until up against bottom of sink or vessel washer. Slide on white washer then locknut onto threads until drain is tight and secure.
6. Test all connections for leaks.
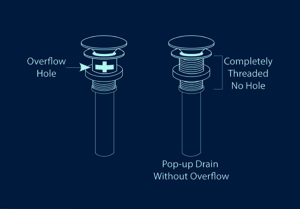
Diagram 1